Saturday, November 16, 2013

Vote on the Latest Kitchen Clock

 
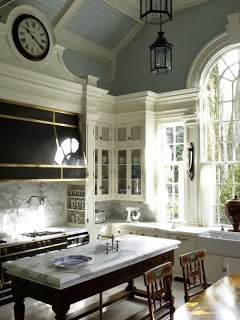
It seemed like a great idea--a clock over the range hood.
Looking back, I should have probably gutted the kitchen and had all new cabinets made.
But no.
I kept the cabinets. And a design debacle was launched.
 
Trim went up.

 
Trim came down.

 
Corbels were added.


Cabinets were primed, in hopes that the white paint
would knock back the corbels and trim.
It didn't work.
 
Finally, a clock arrived.
 
The trim carpenters built a housing.


And another housing.


The third time was not the charm.
As everyone said, it looked as if a mantel clock had been balanced
on the corbels. 


My long-time cabinet maker was consulted. He immediately
pulled down the corbels. Much better. And made a smaller one
by hand.


A small piece of leftover Enkeboll trim was added to the base of the clock.
I felt such relief. The clock would be okay.


More trim was added.
Another corbel was made.
 
It seems to me that the Enkeboll trim (beneath the clock) is a bit lower
than the existing trim (either side of clock, above cabinets). Bandwidth agreed.
Even when the cabinets are painted, the different heights of trim will be visible,
as they are in these photos (thank you for taking them, Bandy!).
 
Will didn't like the corbels at all.
I'm inclined to agree.


The cabinet makers put the clock housing as close as they could to the trim.
Because it juts out, they added smaller corbels.


What's your vote?
Rework the trim?
Remove the corbels?
Or give up on the clock?

Metamorphosis Monday contribution.


Pin It

Social Bookmarking

Thursday, November 14, 2013

Foodie Friday


Welcome to Foodie Friday.
Are your Thanksgiving preparations underway? Will you be cooking at home, cooking with a group, or eating out? Are you trying a new recipe?
 
This week I'm bringing two potato recipes. The first, Simple Rustic Potato soup, is quick and filling, the perfect "one pot meal" for the busy days ahead. The hardest part is microwaving three bags of frozen russet potatoes, and that's not difficult, so you can just imagine the ease of this recipe.


Simple Rustic Potato Soup
                                             Serves 8
Ingredients
3 24 oz packages Ore-Ida Steam n Mash Cut Russet Potatoes
1 32-oz box College Inn Chicken Broth
1 or 2 14-oz cans College Inn Chicken Broth
8 strips bacon
1 cup heavy cream
1 cup chopped white (or yellow) onion
3/4 cup chopped celery
1 c. shredded mild cheddar cheese
salt and pepper to taste
 
Directions:
Cook 1 24-oz package Ore-Ida potatoes in microwave according to directions (ten minutes) and set aside. In a large, non-stick Dutch oven, fry 8 slices of bacon (medium high flame). Crumble bacon and set aside. Add chopped onions and celery to pot and sautee until clear and tender. Add 1 32-oz box chicken broth and cook 10 minutes over medium low flame, stirring now and then. Meanwhile, continue to microwave two remaining packages of frozen potatoes.  Add all three packages of potatoes to Dutch oven. Mash potatoes with a large whisk or metal masher. [I like a rough, "rustic" texture. If you prefer smooth, skip this step and place the cooked potatoes into a Cuisinart or blender, then add to Dutch oven.]
 
Salt and pepper to taste.
 
Cook another 10 minutes. At this point, the soup is thick, and I always add one 14-oz can of chicken stock (if you like a thinner soup, add a second can of stock). Stir. Lower the flame and simmer soup for five minutes. Slowly add 1 cup cream and blend thoroughly. Add more salt and pepper, if necessary. Cover pot and remove from flame.
 
Pour soup into bowls and garnish with crumbled bacon and shredded cheese.

The second recipe is Warm Potato Salad.
It's sassy and comforting, perfect with leftover turkey sandwiches.


Side dishes have always fascinated me.
I come from a long line of Southern women who believe that side dishes are a blend of nutrition and art. My mother will never serve corn and fried apples at the same meal, unless she balances the yellows with green beans or asparagus. She plays matchmaker with "sides," as she calls them, aiming for complimentary companions.

Entrees are easy, but I worry and worry about side dishes. I've been known to fall into a broccoli rut. My mother always tries to repeat flavors. If she marinates a chicken with lime juice, she will serve a key lime pie for dessert.  A Granny Smith smothered pork roast will be paired with an apple raisin salad or apple tarts. And so on and so forth. A warm potato salad with a bacon vinaigrette is the perfect accompaniment for roasted chicken.
This recipe was adapted from a recipe in Potatoes: A Country Garden Cookbook.

Warm Potato Salad with Bacon Vinaigrette

Serves 4
4 potatoes, cut into 1/8" slices
2 cups chicken broth
4-6 strips of bacon, fried and crumbled
1/4 cup green onions, chopped
2 Tablespoons bacon drippings
2 Tablespoons extra virgin olive oil
2 Tablespoons champagne vinegar
2 Tablespoons country style Dijon mustard
sea salt to taste
freshly ground pepper to taste
fresh thyme and Italian parsley
roasted red bell pepper (optional)
Fry bacon and onions. Set aside and reserve 2 tablespoons of drippings. Slice potatoes (unpeeled for a rustic salad) and place in a saucepan. Add 2 cups chicken broth. Cook potatoes 15 minutes over a low flame. Drain potatoes and place in a bowl. Reserve 1/4 cup chicken broth. Into a clean bowl, add broth, olive oil, mustard, vinegar, and bacon drippings. Whisk and pour vinaigrette over potatoes. Sprinkle with bacon and chopped herbs. Cover potatoes (I use a large dinner plate) and steep 15 minutes. Remove plate (or lid) and stir potatoes carefully, making sure you distribute the vinaigrette.
For perky color, add a sliced roasted red bell pepper.


If you are participating in Foodie Friday, locate the blue Inlinkz icon in the lower, left-hand portion of this post. Click on the icon and follow the directions. After you complete the process, you will see a red "x" beside your name. This allows you to delete your link if you made an error; the red "x" is visible to you only.

For a complete guide to this linky party, click HERE.
 
 
** Would you like to add your recipes to the "Consuming Passions" group board at Pinterest?
It can be found HERE.  Foodie Friday folks and pinners are always welcome to "pin" with us and chat about food. Just leave a comment on one of my recent "pins," so I'll be sure to see it, and I will send you an invitation. Or you can email me.

 Thanks for stopping by the party. Have a great weekend.


Thursday, November 7, 2013

Foodie Friday

Welcome to the November 8th Foodie Friday, where great food is always on the menu.
Our internet service is hiccupping tonight--and so are several family members. Without further ado, here is your Foodie Friday party.
 
 
3 Hearty Recipes for November


#1 Pork Roast with Dark Cherry Balsamic Sauce

Ingredients:

1 Boston butt (4 to 6 servings)
1  (15-ounce) can dark sweet pitted cherries in heavy syrup
1 (13 oz) jar Bonne Maman Cherry Preserves
paprika, salt, pepper
3 tablespoons balsamic vinegar
2 tablespoons light brown sugar
3 tablespoons beef consomme'
1/4 teaspoon onion salt
2 tablespoons unsalted butter (for sauce)
1 tablespoon olive oil and 1 tablespoon butter (to sear pork)
12 - 24 fingerling potatoes
6 carrots, peeled and cut into chunks
fresh chives,  snipped [1 - 3 tablespoons] 

Pour canned cherries, including the juice, into a heavy saucepan. Add 1 jar of cherry preserves,
3 tablespoons beef consomme', vinegar, sugar, butter, and onion salt. Stir well, until jam and preserves are blended. Cook on low flame and reduce the liquid. (I tend to burn everything, so I always use a flame tamer.) Meanwhile, prepare the roast. Preheat the oven to 325 degrees F.
Season the roast with salt, pepper, and paprika. Place meat in a large, all-purpose pan and sear the meat on all sides in 1 tablespoon oil and 1 tablespoon butter. Transfer meat to a baking dish.
Add carrots, potatoes, and remainder of beef consomme'. Cover meat with foil and bake 2 hours or until done.While the meat cooks, stir the sauce. It should reduce in about 30 minutes. Remove from the flame.Fifteen minutes before the roast is done, remove foil and drizzle cherry-balsamic sauce over the roast and vegetables. Pour sauce into a gravy boat. Remove roast from oven and let it "collect" itself. Drizzle with more sauce, if desired. Garnish with snipped chives.
 
 
#2 Baked Ziti


Baked Ziti
 
Serves 8
 
Ingredients:
3/4 cup assorted bell peppers, chopped (red/green/yellow)
1 cup onion, chopped
2 teaspoons minced garlic
3 Tablespoons olive oil
2 pounds ground sirloin
1 28-ounce can crushed tomatoes
1 26-ounce jar tomato/pasta sauce
1 Tablespoon Italian seasoning
salt and pepper to taste
1 box ziti (or 1 pound uncooked rigatoni)
1 pound mozzarella cheese, shredded 
1/2 to 3/4 cup heavy cream
Italian parsley, 1/4 cup chopped
9 x 12 baking dish
 
 
Directions:
Cook the ziti according to directions (be sure to add salt to the water). Drain and toss with 1 teaspoon olive oil.
 
Pour 3 Tablespoons olive oil into a Dutch oven or large skillet. Add chopped bell peppers and onions. Sautee over a medium flame. Add 1 teaspoon minced garlic (more, if you like garlicky ziti) and sautee a minute or two (don't brown). 
 
Add ground sirloin (if you use ground chuck, be sure to drain the fat after cooking the meat). Using a wooden spoon, break up the meat. Mix with sauteed vegetables; cook until meat is browned. This takes about 15 minutes. Add crushed tomatoes (I didn't drain the can) and blend. Add tomato sauce.   
 Turn down the flame and let sauce cook down a bit and thicken, about 10-15 minutes.
 
Preheat oven to 350 degrees.
 
Spray the bottom and sides of a 9 X 12 baking dish with Pam.
 
Take 2 cups drained, cooked (still-warm) ziti and place in a mixing bowl. Add 1/4 to 1/2 cup shredded mozzarella and 3 Tablespoons heavy cream. Mix. Place pasta in the bottom of the baking dish. Add a layer of meaty tomato sauce. Top with 1 1/2 cups shredded mozzarella. Take another 2 cups of ziti and add cheese and cream. Pour on top of the mozzarella. Add a layer of tomato/meat sauce. Keep layering. Top with sauce and mozzarella.
 
Cover pan with foil, place pan in oven, and bake 30 minutes. Remove foil and bake 15-20 minutes or until cheese is slightly brown. The baked ziti casserole will look "juicy" around the edges, but that's normal. Remove pan from the oven and cool 15 minutes. This allows the casserole to "collect" itself.
 
Top with chopped Italian parsley.
 
 
#3 Gnocchi


The recipe is available at the following link:
Chef Gordon Ramsay's Gnocchi Recipe


If you are participating in Foodie Friday, please take a moment to read the guidelines.
To add a link to your post, locate the blue Inlinkz icon in the lower, left-hand portion of this post. Click on the icon and follow the directions. After you complete the process, you will see a red "x"
beside your name. This allows you to delete your link if you made an error; the red "x" is visible to you only.

For a complete guide to this linky party, click HERE.


** Would you like to add your recipes to the "Consuming Passions" group board at Pinterest?
The board can be found HERE. We're a small, sociable group; Foodie Friday folks are always welcome to "pin" with us and chat about food. Just leave a comment on one of my recent"pins" so I'll be sure to see it, and I will send you an invitation.
Note: Due to changes at Pinterest, I need to follow one or more of your boards and vice versa before the invitation will go through.

 Thanks for visitin'!


Pin It

Social Bookmarking

Wednesday, November 6, 2013

Progress on the Potting Shed and Courtyard Steps

Renovation always reminds me of molasses running down the blade of a knife.
Dr. Will is facing surgery later this year, and he feels an urgent need to wrap up the garden projects. However, construction is booming in our area, and sub contractors are busy with new houses: framing, wiring, painting, landscaping. Some things are just beyond our control; but a Zen attitude goes a long way to reduce stress when the process moves slowly.
The great wheel of life is unstoppable. When you aren't looking, the molasses turns into fast-running water, and your project rushes ahead, much to your delight.
 
In addition to the Renovation Diary updates on the blog, I keep a handwritten journal, where I ponder molasses. I also jot down paint colors, ideas, choices, worries, and a timeline of events. It's a tool and a stress reliever. I can't remember a time when I wasn't scribbling in a grocery store notebook.
 
Timeline for Potting Shed and Courtyard Steps:

7-29-13:     Discuss potting shed with GC. Search begins for a design plus blueprints.
8-12-13:     Ordered plans for shed ($19.95)
8-20-13:     GC getting bids for shed
9-16-13:     Waiting for bids.
10-1-13:      Blog Update on steps and shed
10-20-13:    Blog Update on Potting Shed
10-21-13:   Meet with framer to discuss shed. Shed staked.
10-23-13:   Meet with landscape architect; shed placement revised
11-1-13:     Gravel delivered for shed. Demo begins for steps.
11-5-13:     Footing for potting shed and courtyard steps.

As you can see from the last two entries, the much-anticipated construction has begun on the potting shed and courtyard steps. Here's a peek at the in-progress construction.


 Part I: The Potting Shed

The trees were still in leaf when I met with my GC, his assistant, and a local framer.
With the blueprints in hand, the men staked a possible building site.


Please excuse my terrible Photoshopping. But this is the general idea. The shed will be angled, so the door can be seen from Will's garden. 


Strings and flags mark the spot, awaiting the landscape architect's approval.

 
A few days later, I met with the GC and the LA, who suggested the shed be moved ten feet to the right, to fit in with future plans for this area.


A week-and-a-half later, the gravel arrived. My GC's assistant, Medana, sent me a photo because I was, and still am, down with a bad cold. But seeing the gravel made me feel better. When the gravel arrives, it means the project is picking up speed. 


Just a few days later, the footing was begun. As a side note, look how the trees have
changed color. Fall is finally here in middle Tennessee.

 
If you stand in Will's garden, you will have a view of the angled shed. The LA said that you always want the eye to keep moving in a garden: from the potager to the shed and so on. If he hadn't pointed that out, I would have totally made the door face the driveway.


The shed won't be a total copy of the inspiration picture.
 
For example, the shed was only 8 feet wide, so we added 3 feet. This affected the pitch of the roof.
The shed will still have the fanciful "witch hat" roof, but it won't be quite as tall. We're adding a Dutch door, too.
 
 
A closer look at the footing.
The builder suggested that I decide where to put the windows after the shed has been framed.
At this time, I will sit down with my GC and we'll pick out all of the materials, so he'll be good to go.


Part II: The Courtyard Steps
 
One day Bandwidth and I arrived early at the house for an appointment. As we walked
around, we talked about the black-top courtyard. My thoughts turned to garden parties--wouldn't it be lovely to walk down steps (votive candles would be everywhere)?
 

My GC liked this idea a lot. It would be good timing to build the shed and steps, since
the equipment would be there anyway.
 
Here's the courtyard from a distance.


 A closer look at the brick wall before the bricks were painted, in 2011.
 
After painting.
 
 The steps will be a smaller version of the front porch steps.
The steps will be limewashed, and the border will be painted, so it will be somewhat less expensive to use mismatched bricks.
 
Demo day on November 1st. 
 
 
The center part of the wall went down.

 
The footing is being prepped. I love how wide these steps will be.


A look back at the two "in progress" projects.


Part III: Dr. Will's Garden Steps
 We are still waiting for the bluestone steps to be installed at Dr. Will's potager garden.
The projected date was September 1st, but it's been moved back to mid-November, as the
LA is still waiting on the bluestone. 

 
Here's the sketch:

8-8-13:     Discuss bluestone steps for Dr. Will's potager garden.
8-28-13:   Sketches received for steps. Projected installation: 9-4-13
10-23-13:  Copper lights have been made. Waiting for delivery of bluestone.
11-5-13:   Still waiting on bluestone. Installation moved back to 11-16-13.


That's it, folks. I hope you've enjoyed the update.
Have a great day, and I'll see you tomorrow at Foodie Friday.


Potting Shed Image Source: Old English Potting Shed

Pin It

Social Bookmarking